https://forum.proxmox.com/threads/install-qemu-guest-agent-on-truenas.83565/
https://www.truenas.com/community/resources/qemu-guest-agent.167/

An old tech guy from the daisy street
Je fais 3 groupes pour mon 192.168.1.*
Dans l’avenir je decouperais en 2 sous reseau (technique / fonctionel et autre)
Technique : 1-99
| Gateway Orange (DHCP desactivé) | 1 |
| Tv Orange | 2 |
| Proxmox | 10 |
| Kubernetes | 20 |
| TrueNas | 40 |
| pihole Dns/dhcp Udp 53/67/547 | 50 |
Fonctionel : 100-199
| Kubernetes Plage IP Service | 100-149 |
| -Kubernetes Dashborad | 100 |
Autre/Pc/IoT : 200-254
sudo nano /etc/netplan/*.yaml
sudo netplan applyajouter la cle public a chaque serveur pour la connection ssh
cat id_rsa_ubuntu.pub >> ~/.ssh/authorized_keys
sudo systemctl restart sshLa commande docker avec le filesystem preparé
docker run -d \
  --name=sickchill \
  -e PUID=1000 \
  -e PGID=1000 \
  -e TZ=Europe/London \
  -p 8081:8081 \
  -v /path/to/data:/config \
  -v /path/to/data:/downloads \
  -v /path/to/data:/tv \
  --restart unless-stopped \
  lscr.io/linuxserver/sickchill
traduction en kubernetes deploy :
apiVersion: apps/v1
kind: Deployment
metadata:
  name: sickchillserver
  namespace: default
  labels:
    app: sickchill
spec:
  replicas: 1
  selector:
    matchLabels:
      app: sickchill
  template:
    metadata:
      labels:
        run: sickchillserver
        app: sickchill
    spec:
      containers:
      - name: sickchillserver
        image: lscr.io/linuxserver/sickchill
        env:
          - name: "PUID"
            value: "1000"
          - name: "PGID"
            value: "1000"
        ports:
        - containerPort: 8081
          name: tr-http
        volumeMounts:
        - mountPath: /config
          name: tr-config
        - mountPath: /downloads
          name: tr-downloads
        - mountPath: /tv
          name: tr-tv
        - mountPath: /anime
          name: tr-anime
      volumes:
      - name: tr-anime
        hostPath:
          type: DirectoryOrCreate
          path: /Videoclub/40-Anime
      - name: tr-tv
        hostPath:
          type: DirectoryOrCreate
          path: /Videoclub/30-Series
      - name: tr-downloads
        hostPath:
          type: DirectoryOrCreate
          path: /Videoclub/00-Tmp/sickchill/downloads
      - name: tr-config
        hostPath:
          type: DirectoryOrCreate
          path: /usr/kubedata/sickchillserver/config
---
apiVersion: v1
kind: Service
metadata:
  name: sickchill-svc
spec:
  selector:
    app: sickchill
  ports:
    - name: "http"
      port: 8081
      targetPort: 8081
  type: NodePort
puis on recupere le recupere le port d’exposition
kubectl get all --all-namespaces | grep sickchill
resultat le dashboard est accessible https://<master-ip>:30610
Modification du deployment de transmission
        volumeMounts:

        - mountPath: /downloads-sickchill
          name: tr-media-sickchill

        - mountPath: /script
          name: tr-script
      volumes:

      - name: tr-media-sickchill
        hostPath:
          type: DirectoryOrCreate
          path: /Videoclub/00-Tmp/sickchill/downloads

      - name: tr-script
        hostPath:
          type: DirectoryOrCreate
          path: /Videoclub/00-Tmp/transmission/script
Mettre à jour la config transmission : settings.json
    "script-torrent-done-enabled": true,
    "script-torrent-done-filename": "/script/transmission-purge-completed_lite.sh",
Les scripts du repertoire /script
sudo systemctl stop systemd-resolved.service
sudo systemctl disable systemd-resolved.service
sur un dns public (8.8.8.8 par exemple)
sudo nano /etc/resolv.confnameserver 8.8.8.8
installer metalLB
https://metallb.universe.tf/installation/
apiVersion: v1
kind: ConfigMap
metadata:
  namespace: metallb-system
  name: config
data:
  config: |
    address-pools:
    - name: default
      protocol: layer2
      addresses:
- 192.168.1.1-192.168.1.5,192.168.1.200-192.168.1.250apiVersion: v1
kind: Service
metadata:
name: pihole-web-service
namespace: pihole-ns
spec:
selector:
app: pihole
ports:
- name: web
protocol: TCP
port: 80
targetPort: 80
type: LoadBalancer
---
apiVersion: v1
kind: Service
metadata:
name: pihole-dns-service
namespace: pihole-ns
spec:
selector:
app: pihole
ports:
- name: dns
protocol: UDP
port: 53
targetPort: 53
type: LoadBalancer
sur le dns pihole (192.168.1.241)
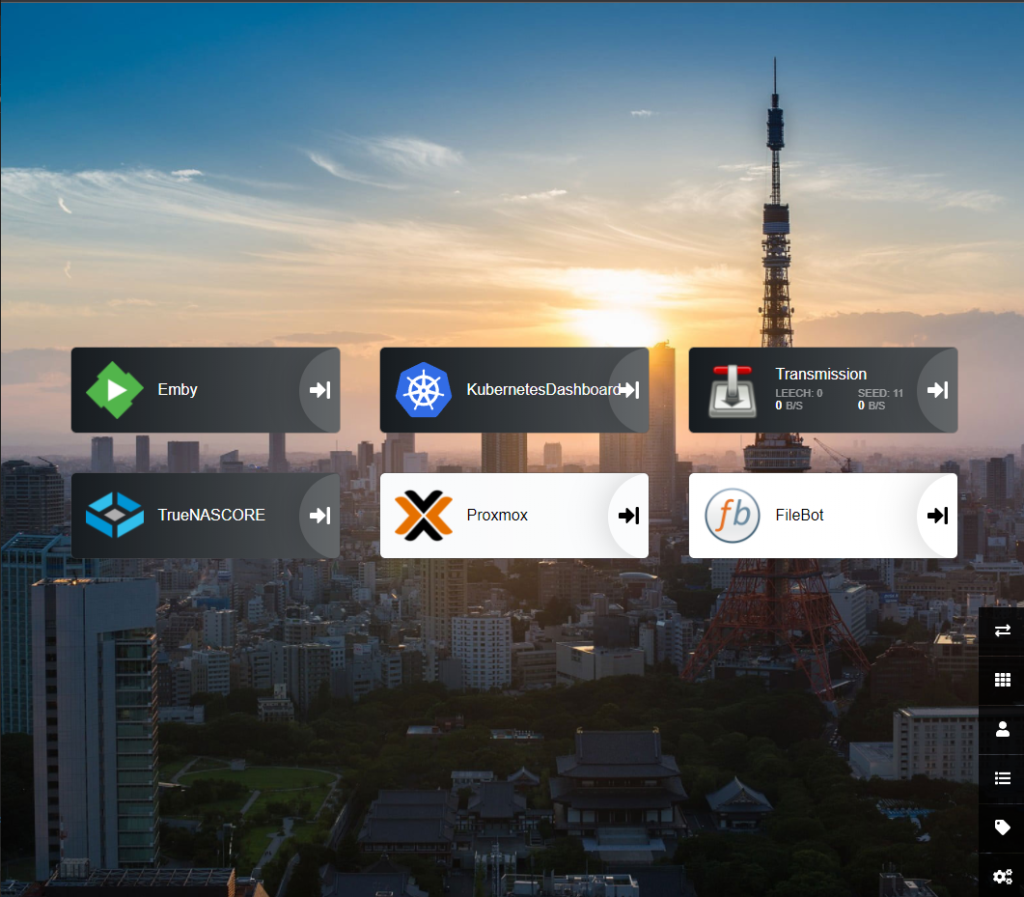
sudo nano /etc/resolv.confnameserver 192.168.1.241Passer le service heimdall de nodeport ClusterIP
apiVersion: networking.k8s.io/v1
kind: Ingress
metadata:
  name:  heimdall-svc-ingress
  namespace: default
spec:
  ingressClassName: public
  rules:
  - host: heimdall.daisy-street.local
    http:
      paths:
      - pathType: Prefix
        path: "/"
        backend:
          service:
            name: heimdall-svc
            port:
number: 80 192.168.1.26 heimdall.daisy-street.local 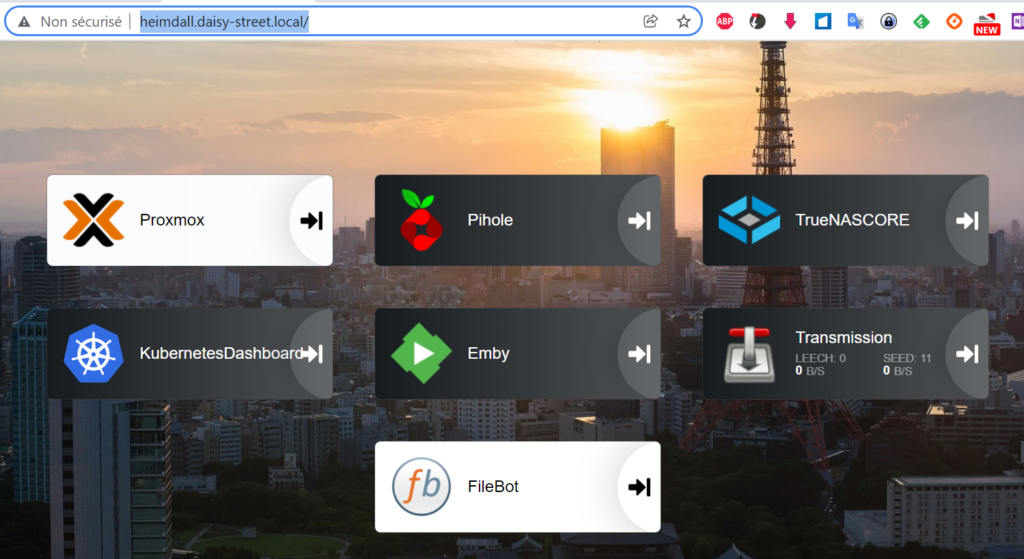
La commande docker-compose avec le filesystem preparé
version: "3"

# More info at https://github.com/pi-hole/docker-pi-hole/ and https://docs.pi-hole.net/
services:
  pihole:
    container_name: pihole
    image: pihole/pihole:latest
    ports:
      - "53:53/tcp"
      - "53:53/udp"
      - "67:67/udp"
      - "80:80/tcp"
    environment:
      TZ: 'America/Chicago'
      # WEBPASSWORD: 'set a secure password here or it will be random'
    # Volumes store your data between container upgrades
    volumes:
      - './etc-pihole/:/etc/pihole/'
      - './etc-dnsmasq.d/:/etc/dnsmasq.d/'
    # Recommended but not required (DHCP needs NET_ADMIN)
    #   https://github.com/pi-hole/docker-pi-hole#note-on-capabilities
    cap_add:
      - NET_ADMIN
    restart: unless-stopped
traduction en kubernetes deploy :
apiVersion: apps/v1
kind: Deployment
metadata:
  name: piholeserver
  namespace: default
  labels:
    app: pihole
spec:
  replicas: 1
  selector:
    matchLabels:
      app: pihole
  template:
    metadata:
      labels:
        run: piholeserver
        app: pihole
    spec:
      containers:
      - name: piholeserver
        image: pihole/pihole:latest
        env:
          - name: "DNS1"
            value: "9.9.9.9"
          - name: "DNS2"
            value: "149.112.112.112"
        ports:
        - protocol: TCP
          containerPort: 53
          name: pihole-http53t
        - protocol: UDP
          containerPort: 53
          name: pihole-http53u
        - containerPort: 67
          name: pihole-http67
        - containerPort: 80
          name: pihole-http
        volumeMounts:
        - mountPath: /etc/pihole/
          name: pihole-config
        - mountPath: /etc/dnsmasq.d/
          name: pihole-dnsmasq
      volumes:
      - name: pihole-config
        hostPath:
          type: DirectoryOrCreate
          path: /usr/kubedata/piholeserver/pihole
      - name: pihole-dnsmasq
        hostPath:
          type: DirectoryOrCreate
          path: /usr/kubedata/piholeserver/dnsmasq.d
---
apiVersion: v1
kind: Service
metadata:
  name: pihole-svc
spec:
  selector:
    app: pihole
  ports:
    - name: "http53u"
      protocol: UDP
      port: 53
      targetPort: 53
    - name: "http53t"
      protocol: TCP
      port: 53
      targetPort: 53
    - name: "http67"
      port: 67
      targetPort: 67
    - name: "http"
      port: 80
      targetPort: 80
      nodePort: 30499
  type: NodePort
puis on recupere le port d’exposition
kubectl get all --all-namespaces | grep heimdall
resultat le dashboard est accecible https://<master-ip>:31541
Le password de l’admin est dans la log du pod
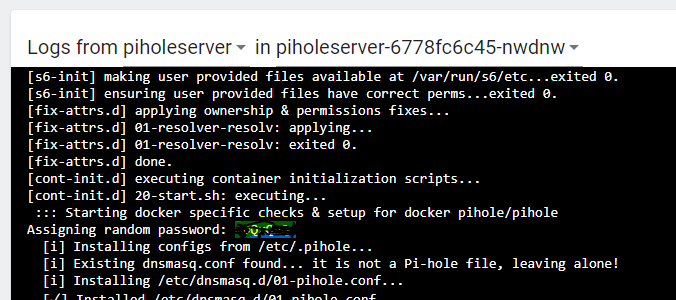
ou on peut definir un password en ligne de commande dans le pod
sudo pihole -a -pLa commande docker avec le filesystem preparé
docker run -d \
  --name=heimdall \
  -e PUID=1000 \
  -e PGID=1000 \
  -e TZ=Europe/London \
  -p 80:80 \
  -p 443:443 \
  -v </path/to/appdata/config>:/config \
  --restart unless-stopped \
  lscr.io/linuxserver/heimdall
traduction en kubernetes deploy :
apiVersion: apps/v1
kind: Deployment
metadata:
  name: heimdallserver
  namespace: default
  labels:
    app: heimdall
spec:
  replicas: 1
  selector:
    matchLabels:
      app: heimdall
  template:
    metadata:
      labels:
        run: heimdallserver
        app: heimdall
    spec:
      containers:
      - name: heimdallserver
        image: lscr.io/linuxserver/heimdall
        env:
          - name: "UID"
            value: "1000"
          - name: "GID"
            value: "100"
        ports:
        - containerPort: 80
          name: heimdall-http
        - containerPort: 443
          name: heimdall-https
        volumeMounts:
        - mountPath: /config
          name: heimdall-config
      volumes:
      - name: heimdall-config
        hostPath:
          type: DirectoryOrCreate
          path: /usr/kubedata/heimdallserver/config
---
apiVersion: v1
kind: Service
metadata:
  name: heimdall-svc
spec:
  selector:
    app: heimdall
  ports:
    - name: http
      port: 80
      targetPort: 80
      nodePort: 32501
    - name: https
      port: 443
      targetPort: 443
  type: NodePort
puis on recupere le port d’exposition
kubectl get all --all-namespaces | grep heimdall
resultat le dashboard est accecible https://<master-ip>:32501
La commande docker avec le filesystem preparé
docker run --rm -it \
     -v /Videoclub:/videoclub \
     -v /usr/kubedata/filebot-node/data:/data \
     -p 5452:5452 \
     maliciamrg/filebot-node-479
traduction en kubernetes deploy :
apiVersion: apps/v1
kind: Deployment
metadata:
  name: filebot-node
  namespace: default
  labels:
    app: filebot
spec:
  replicas: 1
  selector:
    matchLabels:
      app: filebot
  template:
    metadata:
      labels:
        run: filebot-node
        app: filebot
    spec:
      containers:
      - name: filebot-node
        image: maliciamrg/filebot-node-479
        ports:
        - containerPort: 5452
          name: filebot-http
        volumeMounts:
        - mountPath: /data
          name: filebot-data
        - mountPath: /videoclub
          name: filebot-media
      volumes:
      - name: filebot-data
        hostPath:
          type: DirectoryOrCreate
          path: /usr/kubedata/filebot-node/data
      - name: filebot-media
        hostPath:
          type: Directory
          path: /Videoclub
---
apiVersion: v1
kind: Service
metadata:
  name: filebot
spec:
  selector:
    app: filebot
  ports:
    - name: "http"
      port: 5452
      targetPort: 5452
  type: NodePort
puis on recupere le recupere le port d’exposition
kubectl get all --all-namespaces | grep filebot
resultat le dashboard est accecible https://<master-ip>:32580
Deployer et lancer l’image filebot-node dans un docker
https://hub.docker.com/r/rednoah/filebot
docker run --rm -it -v $PWD:/volume1 -v data:/data -p 5452:5452 rednoah/filebot:node &
puis recupere l’id du container
docker container ls

envoyer le fichier filebot_4.7.9_amd64.deb dans le container
docker cp filebot_4.7.9_amd64.deb c35b578723a3:/tmpEntre dans le container
docker exec -it c35b578723a3 bash
deployer filebot
sudo dpkg -i /tmp/filebot_4.7.9_amd64.deb
sudo apt update
sudo apt install nano
nano /opt/filebot-node/server/app.js
commit de l’image
docker commit c35b578723a3 maliciamrg/filebot-node-479docker save -o filebot-node-479.tar maliciamrg/filebot-node-479
ou
docker login
docker image push maliciamrg/filebot-node-479arreter le container
docker container kill c35b578723a3et suprimer l’image
docker image rm maliciamrg/filebot-node-479