smart shutter firmware

https://github.com/openshwprojects/OpenBK7231T_App

https://templates.blakadder.com/WF-CS01_EU.html

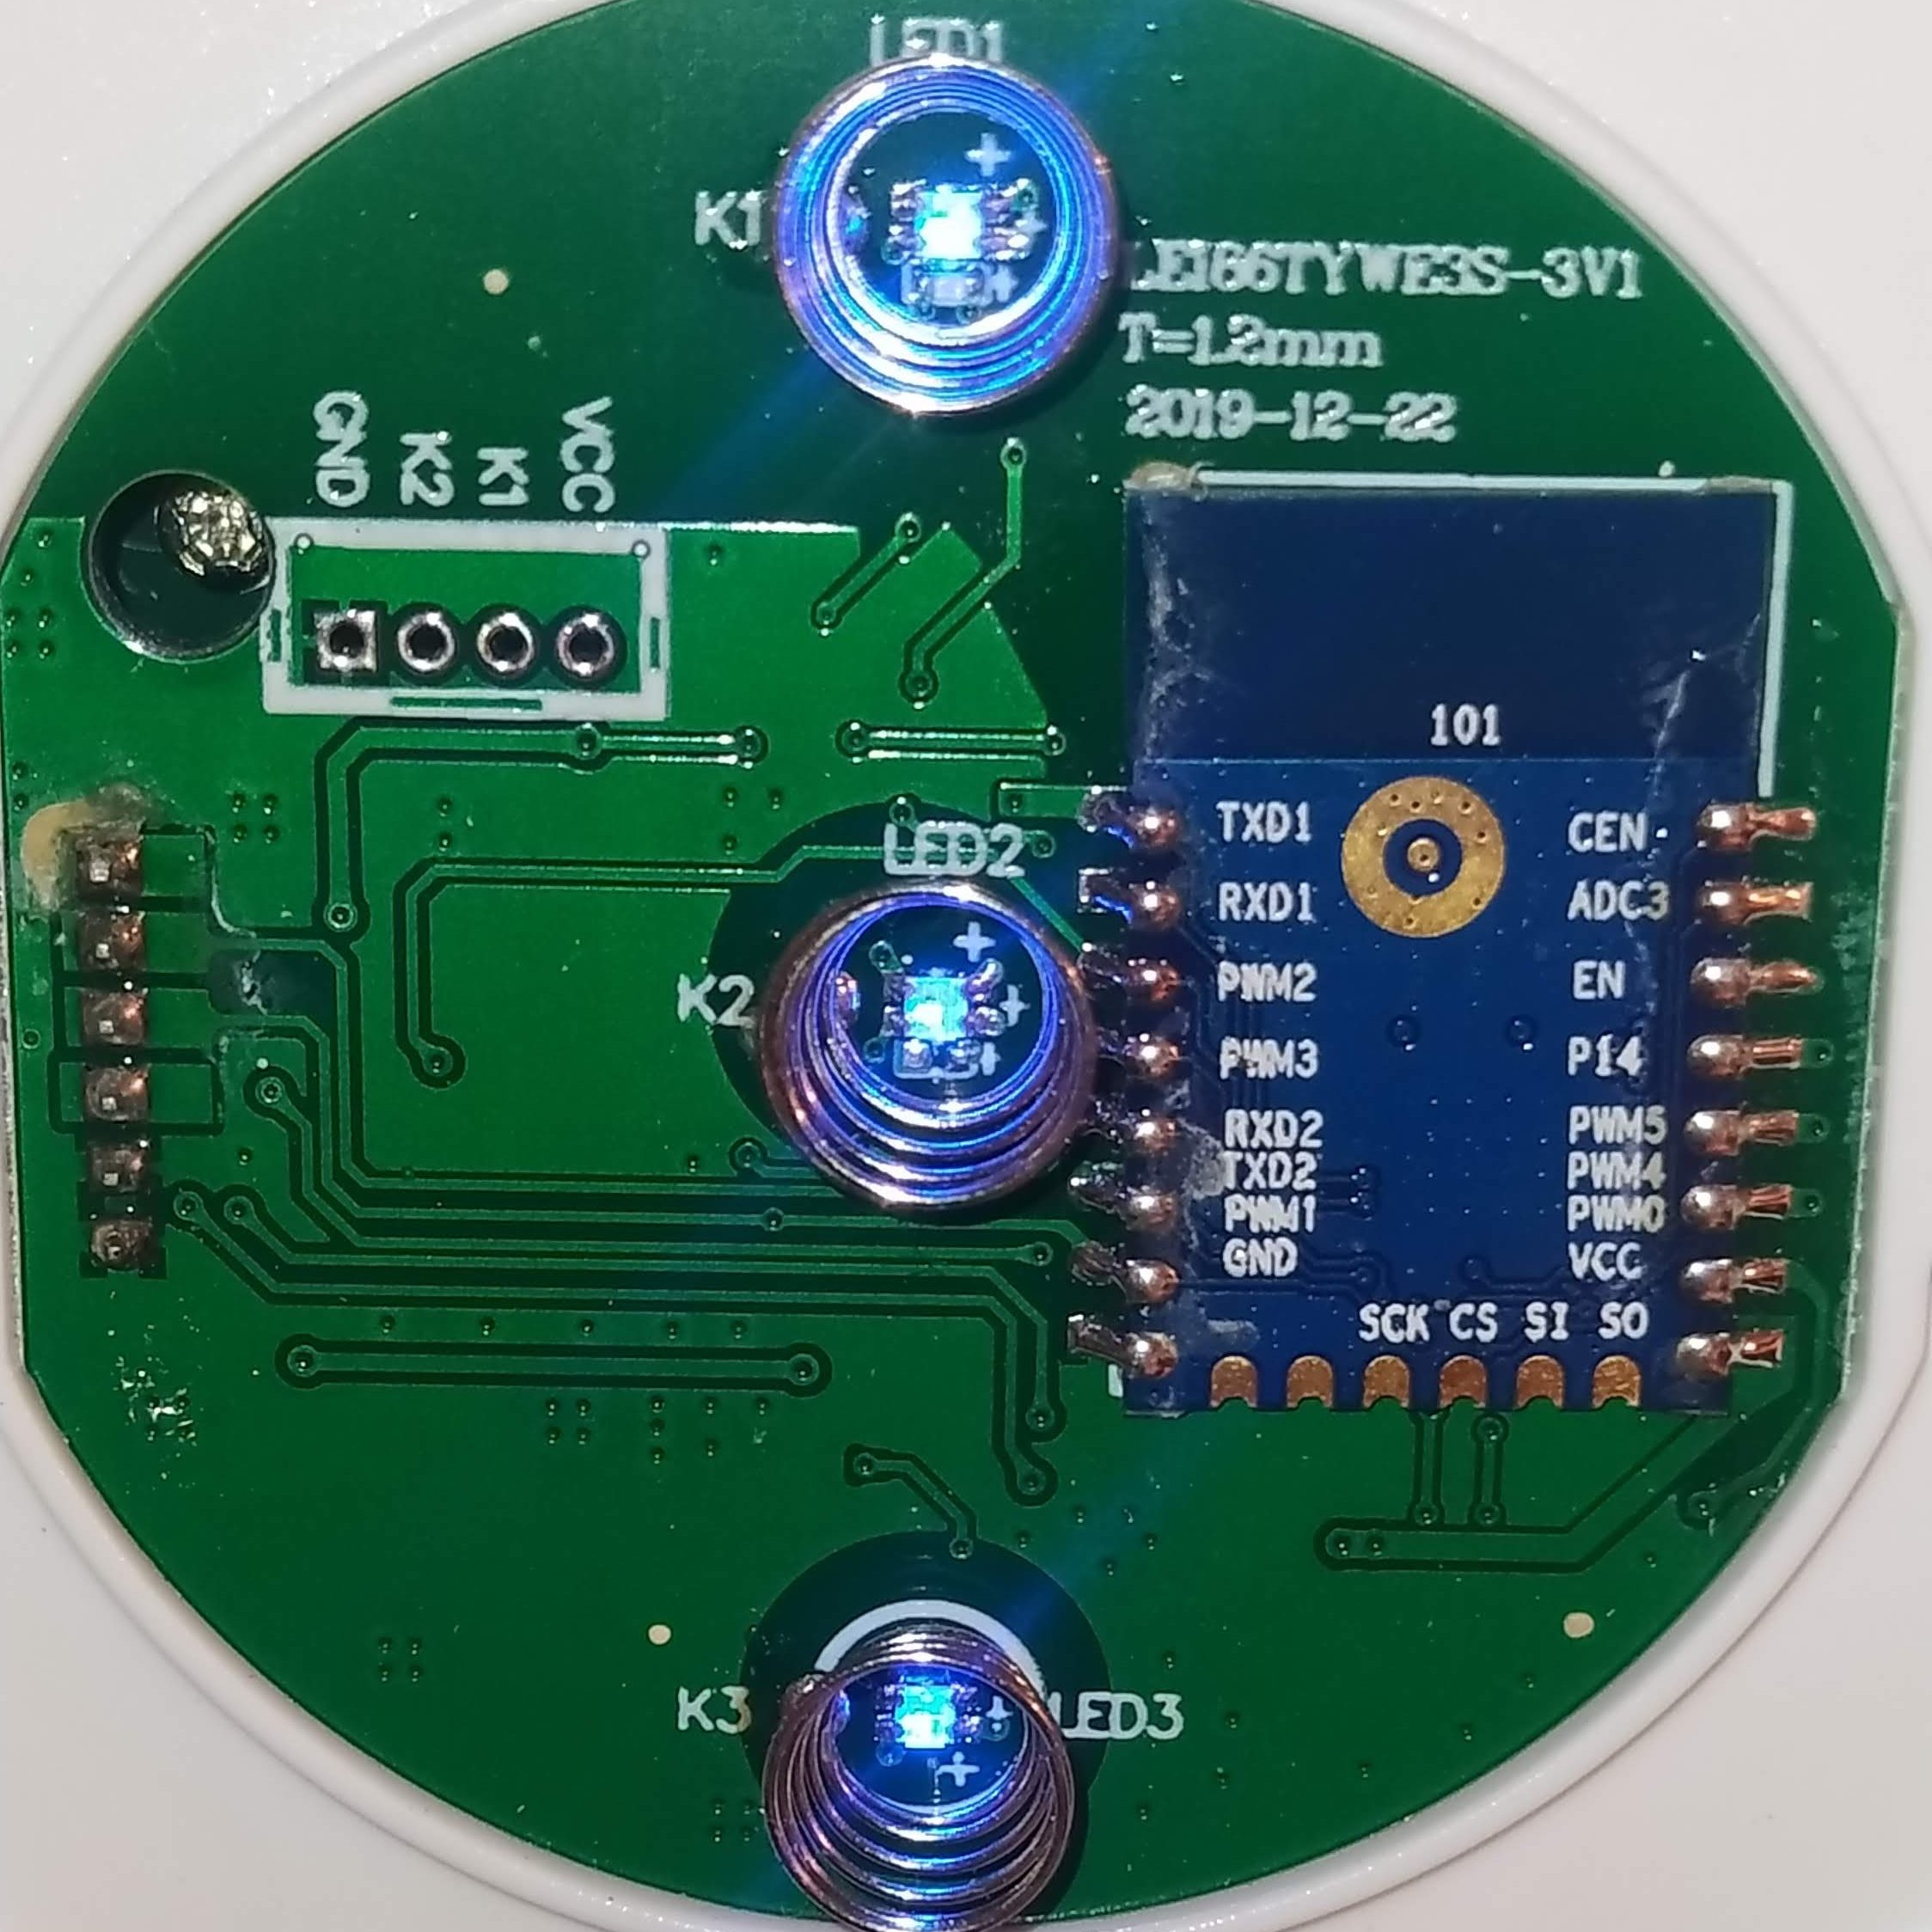
https://developer.tuya.com/en/docs/iot/wb3s-module-datasheet?id=K9dx20n6hz5n4

https://community.home-assistant.io/t/detailed-guide-on-how-to-flash-the-new-tuya-beken-chips-with-openbk7231t/437276

https://github.com/openshwprojects/OpenBK7231T_App/blob/main/docs/commands.md

https://www.elektroda.com/rtvforum/viewtopic.php?p=20433363#20433363

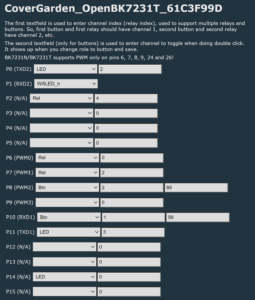
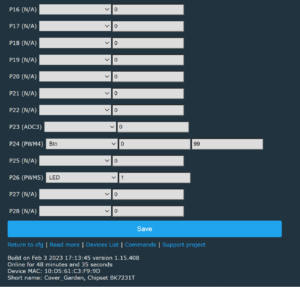
//Channel 0 ==> opening 
//Channel 1 ==> stop 
//Channel 2 ==> closing 
//Channel 3 ==> Color Blue (night Mode) 
//Channel 4 ==> value_template (open / closed)


//blue led on
SetStartValue 3 1

// interlock relais
addChangeHandler Channel0 == 1 SetChannel 2 0
addChangeHandler Channel2 == 1 SetChannel 0 0

//cancel button
addChangeHandler Channel1 == 1 SetChannel 0 0
addChangeHandler Channel1 == 1 SetChannel 2 0

//toggle night led mode
addEventHandler OnHold 10 ToggleChannel 3

//auto cancel relais after delai 34s
addChangeHandler Channel0 == 1 addRepeatingEventID 34 1 910 backlog SetChannel 0 0;SetChannel 4 1;
addChangeHandler Channel2 == 1 addRepeatingEventID 34 1 912 backlog SetChannel 2 0;SetChannel 4 0;

//auto cancel cancel button after 5s
addChangeHandler Channel1 == 1 addRepeatingEventID 5 1 911 SetChannel 1 0

//auto cancel cancel relai
addChangeHandler Channel1 == 1 cancelRepeatingEvent 910
addChangeHandler Channel1 == 1 cancelRepeatingEvent 912

https://community.home-assistant.io/t/template-cover-for-garage-door/241763/26

      garden:
        unique_id: template_cov_gardene
        device_class: shutter
        friendly_name: "Cover Garden"
        open_cover:
          - service: switch.turn_on
            target:
              entity_id: switch.obk61c3f99d_0
        close_cover:
          - service: switch.turn_on
            target:
              entity_id: switch.obk61c3f99d_2
        stop_cover:
          service: switch.turn_on
          target:
            entity_id: switch.obk61c3f99d_1
        value_template: >-
          {% if is_state('switch.cover_garden_4', 'on') %}
            open
          {% else %}
            closed
          {% endif %}

Wall Thermostat firmware

https://tasmota.github.io/docs/devices/TYWE3S/

https://templates.blakadder.com/Moes_WHT-HY609.html

https://github.com/blakadder/templates/blob/master/_templates/Moes_WHT-HY609

https://tasmota.github.io/docs/TuyaMCU/#dpid

https://github.com/sillyfrog/Tasmota-Tuya-Helper

{"NAME":"WHT-HY609-GB-WH-MS","GPIO":[0,2304,0,2272,0,0,0,0,0,0,0,0,0,0],"FLAG":0,"BASE":54,"CMND":"tuyamcu 11,1 | tuyamcu 71,3 | tuyamcu 72,2 | tuyamcu 63,4"}

https://blakadder.com/tuya-climate/

mqtt:
  climate:
    name: "MQTT Heater"
    unique_id: mqtt_heater_generic_thermostat
    modes: 
      - "heat"
      - "off"
    mode_command_topic: "cmnd/tasmota_6F492A/POWER1"
    mode_command_template: "{{'1' if value == 'heat' else '0'}}"
    mode_state_topic: "tele/tasmota_6F492A/STATE"
    mode_state_template: "{{'heat' if value_json.POWER == 'ON' else 'off'}}"
    current_temperature_topic: "tele/tasmota_6F492A/SENSOR"
    current_temperature_template: "{{value_json['TuyaSNS']['Temperature']}}"
    temperature_state_topic: "tele/tasmota_6F492A/SENSOR"
    temperature_state_template: "{{value_json['TuyaSNS']['TempSet']}}"
    min_temp: 18
    max_temp: 28
    precision: 0.5
    temperature_command_topic: "cmnd/tasmota_6F492A/TUYASEND2"
    temperature_command_template: "2,{{value*10|int}}"
    availability_topic: tele/tasmota_6F492A/LWT
    payload_available: Online
    payload_not_available: Offline

smart switch

https://codesandbolts.com/girier-smart-switch-wifi-w6b

https://github.com/ct-Open-Source/tuya-convert/issues/721

Hi Guys,
I also had a long time to try flash this WiFI-W6B. My solution is to unsolder and lift up pin 11 of unmarked chip (see yellow route on screen above). This route is connected to U0RXD (pin 25) of ESP8285 and probably blocking UART exchange.
Also don’t forget about GPIO0.
Good luck all.

In this PCB we can see a different orientation of unmarked chip. After tracing I make sure that pin 5 (not 11 as earlier!) is connected to pin 25 (U0RXD) of ESP8285. When I applied the previous method and lift up pin 5 of unmarked chip, flashing was started.

{"NAME":"1 Gang","GPIO":[0,288,0,0,0,32,0,0,224,0,0,0,0,0],"FLAG":0,"BASE":1}
{"NAME":"2 Gang","GPIO":[0,288,0,32,33,0,0,0,0,224,225,0,0,0],"FLAG":0,"BASE":29}
{"NAME":"3 Gang","GPIO":[0,52,0,17,19,18,0,0,22,21,23,0,0],"FLAG":0,"BASE":30}

smart plug update firmware 2

https://community.home-assistant.io/t/detailed-guide-on-how-to-flash-the-new-tuya-beken-chips-with-openbk7231t/437276

https://github.com/maliciamrg/OpenBK7231T_App

https://github.com/openshwprojects/OpenBK7231T/blob/master/bk_writer1.60.zip

https://developer.tuya.com/en/docs/iot/wb2s-module-datasheet?id=K9ghecl7kc479

https://www.elektroda.com/rtvforum/topic3937910.html

It is strongly advised to calibrate the plug. You are using default values which are not perfect for your exact device.

Please get a reliable power meter, plug the 60W bulb into the socket, and use following commands to adjust readings:
– VoltageSet [RealVoltageFromReliableMeter]
– CurrentSet [RealCurrentFromReliableMeter]
– PowerSet [RealPowerFromReliableMeter]
Just like in Tasmota.

PowerSet 77

VoltageSet 220

CurrentSet 350 (1000*(77.0/220.0))